

Configuring the NCD Predictive Maintenance Sensor
- Elipsa

- Aug 10, 2022
- 7 min read

Over the course of the next several posts, we will detail how to take the NCD Predictive Maintenance sensor, fresh out of the box, and connect it to the Elipsa platform to start intelligently monitoring a range of equipment via Elipsa’s automated machine learning capabilities.
In the first post, we start with the hardware and walk you through how to configure the device to start generating and transmitting data to later be used by Elipsa.
NCD Hardware
To start, we are utilizing NCD’s Industrial IoT Wireless Predictive Maintenance Sensor V3.
As the name implies, this is an industrial strength sensor capable of detecting various measurements of vibration, as well as temperature and current. These data points are utilized in driving AI-based predictive maintenance for multiple types of equipment, most notably rotating equipment.
While the sensor is capable of detecting, we also need to transmit what is detected. For this, NCD offers a variety of different modems and gateways. In our case, we are utilizing the Industrial IoT Wireless MegaModem as we want to take advantage of a few different connectivity options, namely Wi-Fi and MQTT as we will get into with future posts.
With the hardware in hand, it’s time to walk through the steps of setting up the equipment to start generating data.
Configure MegaModem
To configure the modem, we utilized the MegaModem user guide on the NCD website.
First, you need to ensure the device is in setup mode. This is the initial state of the device when first powered on, but since we had a bit of trial and error in the setup process, you may need to enter setup mode manually.
To enter setup mode manually:
remove the lid of the MegaModem, press and hold the CFG button until the LED flashes blue. In our experience, the LED starts flashing green after ~5 seconds. Continue to hold the button until the LED turns blue after ~15 seconds.
With the modem in setup mode, you can now configure the different ways to connect to the device for attaching sensors and streaming live data.
Access the MegaModem Config Page:
Disconnect your computer from all LAN and Wi-Fi networks.
Search Wi-Fi networks on your computer and connect to the MegaModem network with password NCDBeast . Note: the MegaModem network will only appear when the device is in setup mode. If you do not see the network listed, retry the manual steps above.
Once connected, your browser should redirect to the MegaModem config page but if not it is assessable by entering 172.217.28.1 into your web browser. Note: if you do not connect from all other networks you may not be able to access this page.
Initially, we configured the modem for USB and Bluetooth connectivity.
Looking at the resources section of the sensor's webpage, we sought out to configure the modem and sensor using Alpha Station. Downloading and running Alpha Station, we were able to connect to our modem using Bluetooth. The software also detected the sensor but with an error ‘Unknown Data Source’.
Looking into this in the NCD community forum, we noted that our particular sensor is not compatible with Alpha Station and needs to be configured using Node-Red.
As we will note below, we also had issues connecting our modem to Node-Red via USB/Serial because of some configuration issues specific to our computer so we went back into setup mode to configure the Wi-Fi settings.
Configure MegaModem for Wi-Fi Access

Back on the MegaModem configuration page, we clicked on the Wi-Fi section. Using the dropdowns we found our correct Wi-Fi network and entered the password for our network.
Initially we sought to utilize DHCP; however, the configuration page does not display the IP that is pulled for the modem and we did not have an easy way of finding the assigned IP on our lab network. So, we assigned a static IP instead.
Configuring the Sensor via Node-Red
With the modem connectivity established via Wi-Fi, we moved on to setting up the sensor.
In addition to our detailed steps below, NCD also provides a video detailing how to utilize their Node-Red nodes to configure enterprise sensors.
We utilize Node-Red in other applications and thus we already have it installed but for users new to Node-Red, download it for free from their website.
To configure the sensor and connect it to the modem, you first need to download the NCD Wireless nodes through Node-Red and then configure them within a Node-Red flow. Below are the series of quick steps to follow:
Install NCD Nodes

To get started, we will first need to install the correct NCD nodes to the Node-Red palette (the list of nodes on the left hand side). To do so, click the menu icon in the top right (three lines) and select Manage Palette.
Click the install tab.
Where it says search modules enter ncd-red-wireless and click the install button.
Note: we originally encountered errors when trying to install the nodes. After finding a related issue in the NCD community, we needed to downgrade our version of node.js to 12.20.1. We were able to find and download node.js 12.20.0 here and install the nodes without issue.
You will now see the NCD Wireless Gateway and Wireless Device nodes in your palette.
Configure the Modem Node
First, we need to attach to our MegaModem by dragging a Wireless Gateway Node onto the wiresheet on the right.

When the Properties details appear:
Name your node
Click the edit icon next to Serial Device. When the second Properties page appears
Name your Modem
Select TCP (Ethernet/Network) from the dropdown menu
Enter the IP address of your modem that you configured earlier

Your modem is now connected to Node-Red.
To confirm this, drop in a debug node and connect it to the output of your Wireless Gateway.
The result is that when your modem/gateway connects to Node-Red, the debug log on the right will show the MAC address of your modem which will match the sticker on the side of your MegaModem case.
Your modem is now connected and ready for the next step of configuring your sensor to send data through it.
Configure Your Predictive Maintenance Sensor
First connect the vibration and current/temp sensors to ports on your sensor case. Remove the cover and switch on the sensor as they are shipped off by default.
To turn on the sensor, find the black switch located next to where the batteries from the case’s top connects to the main board. Push the switch towards the wall of the case to turn it on.
Configure Device in Node-Red:
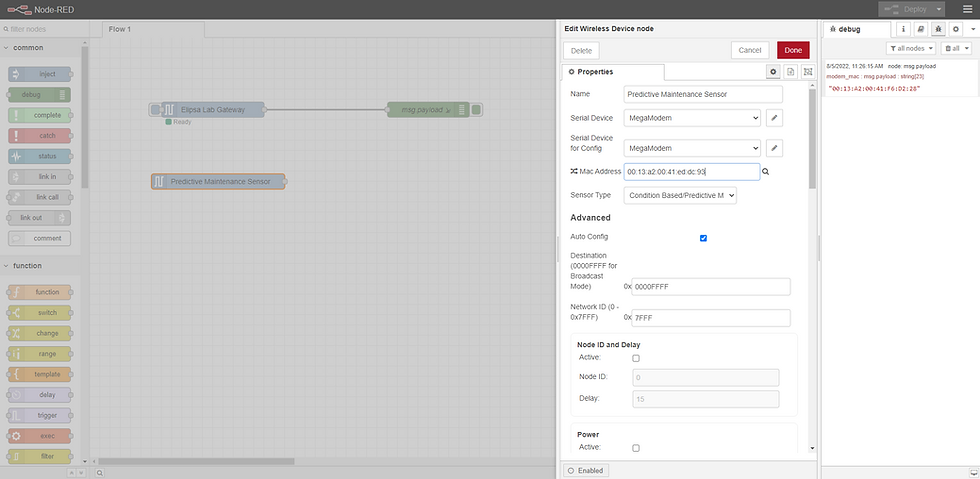
Drag an NCD Device node onto your wiresheet and name the node
On the properties form, select the modem name that you just added in the Serial Device and Serial Device for Config drop downs.
Double click the search icon to the right of MAC Address. This will show you the MAC address of all sensors that the MegaModem detects. Find and click the MAC that matches the value on the sticker located on the side of your sensor's case.
The sensor type should automatically populate with ‘Condition Based/Predictive Maintenance’
Check the box next to Auto Config
Your device now is setup to connect to your modem with the default settings. For our particular use case we changed the following settings:
Check the Active Box under Node ID and Delay and change the delay to 1 (1 second). This will set the sensor to record data approximately every 1 second.
Under Measurement Mode check off Active and select ‘Processed data, acc in mg…’ from the drop down. This value will change based on the use case and will change in future posts depending on the machine we are monitoring and how often we want to analyze data.
Under Sampling Interval check Active and change the value to 1 Minute. This will collect data based on the delay setting you set in #1 and then transmit these results every 1 minute.
Under Full Scale Range, check Active and choose your preferred setting. Our test equipment does not have a strong vibration profile so we are using a lower range.
Under Configure Enabled Axes, select all three X, Y, Z
Click Done
These settings will read vibration measurements every second calculating a variety of vibration calculations and transmitting them every minute.
Push Config to Device/Modem
To push this configuration to the device, we need to put the modem into configuration mode. We can do this quickly In Node-Red by clicking the button on the left side of the Wireless Gateway node. The status of the node will switch to a yellow color with the label Configuring.

With the modem in configuration mode, take the sensor and manually do the following to pull the new configuration:
Remove the lid
Push and release the Reset button
Push and hold the CFG button for ~ 8 seconds

When you release the button, you will see the status of your device change in node red. It will go through a series of steps to pull the config.
When the status displays as Config Complete, we complete the task by taking the modem and sensor out of configuration/setup mode:
Modem: in Node-Red push the button on the left of the Wireless Gateway node
Sensor: on the physical sensor, push the reset button
Your sensor is now configured and sending data to Node-Red. To confirm this, with the modem/gateway connected to the debug node, you should now see streaming data appear in the debug log every minute as the sensor transmits data.

Next Steps
With our sensor configured and streaming data, there are a range of tasks that you can perform within Node-Red.
In our next post, we will detail how to configure the Elipsa's AI-based Predictive Maintenance solution to integrate directly into your Node-Red instance via REST APIs.
While it appears that Node-Red is required for configuration of the NCD Predictive Maintenance sensor, many of you may not utilize Node-Red in your production application. As a result, our third post will go back into the MegaModem config to show you how to integrate your NCD sensor data directly into Elipsa via MQTT.
Elipsa is a leader in delivering fully automated, scalable AI solutions for industrial IoT applications. Elipsa’s AI-based, Predictive Maintenance seamlessly deploys across any workflow on the edge or in the cloud, increasing the availability and output of critical equipment. Elipsa’s self-training AI models and bolt-on approach enable AI deployments that are simple, fast, and flexible. To learn more, please visit https://www.elipsa.ai


Comments